
Tags
Clothes hanger, diy wedding, Do it yourself, monogram wedding dress hanger, vintage wedding ideas, Wedding dress, winter wedding ideas, yarn

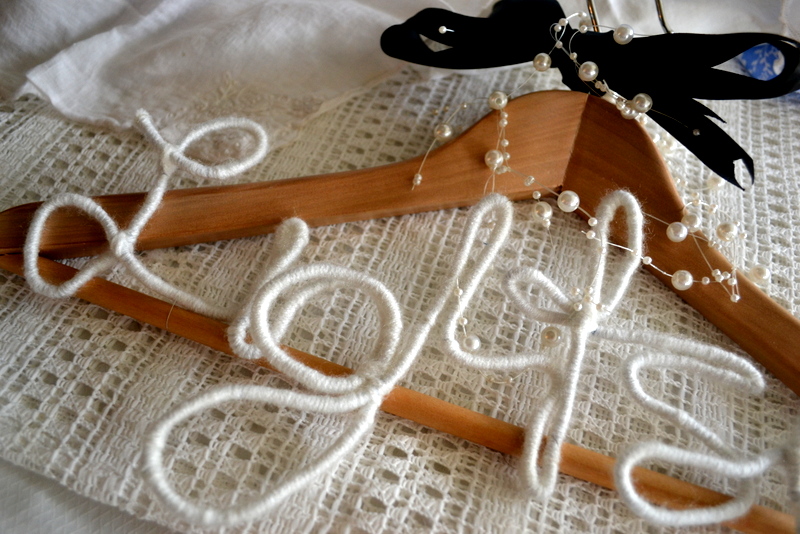
Yarn: Yarn, yarn, yarn, yarn. Since I had to buy a whole skein for my yarn ornaments, I’ve been working on getting rid of it and I’m finding innumerable uses for this wonder-string besides it’s actual purpose. This project sort of evolved from something else and, as you might be able to tell, it didn’t quiteee evolve far enough but I decided to show you anyway since fails happen in real life and it wouldn’t be completely fair if I edited all of mine out. Did you figure out my fail yet from the picture? Yep, I forgot the “Mrs.” I was rather crestfallen after I had finished it, taken pictures, settled down to edit and post, and it hit me…Lightsey what? Mrs. Lightsey! Ugh. Oh well. You get the idea, yes? I’m putting part of the blame on the fact that I originally saw a project for making yarn words here and decided it was so cute I wanted to do it. When I decided I wanted to do my last name, I suddenly realized if I took the DIY a little further, it could be exactly like the wedding dress hangers that have recently become oh-so-popular with the bride’s new last name gracing the hanger of the all-important dress. Somehow, it slipped my mind that those three little letters, M-R-S, were also a slightly essential addition to the name change. Anyway, here it is with my fail and without a Mrs.:
DIY Monogram Wedding Dress Hanger
you will need:
-coated wire
-yarn
-hot glue
-wooden hanger
 It took about four feet of wire to do a word with eight letters in it. Depending on what you’re writing and how big you want it, this might vary. This coated wire is super cheap and comes in spools though so it’s easy to adjust the length. The original DIY I got the idea from used coated clothesline instead of electrical wire, but I already had this wire so I made it work.

Use hot-glue to secure the yarn at the beginning of the word and then just start wrapping. It looks like it would take centurys, but you get into a rhythm and it actually goes pretty quick. make sure you’re wrapping very tightly, otherwise the wire will show through and it will look messy. I didn’t cut my yarn into smaller strips while I was winding even though you might be tempted to. Too many seams in the word will also make it look messy so hang in there and don’t cut it until the end!  You could hot glue your word to your hanger if you want it to be more permanent, but I chose to tie it on with invisible wire since I think I’m going to be using the word for other things, and (bonus), since I did it wrong anyway, I can easily cut the wire and fix it once I’m over my frustration and ready to do it again.

There you have it for your Monday: some truthful confessions of a DIY fail. I think it’s cute even partially finished, and, for a winter wedding, the yarn is a cozy little touch instead of the hard, silver wire these monogram hangers are usually done with. Another plus, you don’t have to go white, you can easily customize the yarn- color to whatever your colors are. Happy new week everyone!
– ❤ A.
Posts Like This:

Yarn Animals Anthropologie Ornaments


Pingback: DIY “Calling Cards”: making business personal | vintage muse modern views
Pingback: DIY Beatrix Potter Hand-Painted Eggs | vintage muse modern views